Return to FAQ Page
General Questions on Enviro Data
Answers to common questions about using Enviro Data.
Questions

This error occurs with a shared installation where Enviro Data is not seeing your Enviro Data license database on the server. Enviro Data uses a database file named GCSLicense.mde to keep track of how many licenses have been purchased and, how many are currently in use. It should be stored in a location on your server where you have read\write access rights. This error occurs because your computer cannot locate the file because something has changed with your computer or the network path to your server where the license is stored. To correct the error you will need to find the new path to the license database, make some changes, and then connect to it again.
- Make sure both the Editor and Viewer programs are closed.
- Locate the location of the license file.
- In your computer's C:\Enviro/EData8 folder find and delete the file named “eKey.lck”.
- Open the Editor .
- When the SETUP LICENSE form opens, fill in your licesnse key.
- When asked, point this computer to the license file on your server.
If this was a change to your network or server, you will likely need to do this on other computers in your office.
If you cannot locate the license database, or do not know you Enviro Data key code, please contact
The Settings8.mdb file is created when installing Enviro Data for the first time and stores most of the settings used for reporting, importing and exporting data. It also keeps track of your current database. Setting8 is typically stored in the same folder as the main program files, C:\Enviro\EData8. If for some reason Setting8 is not attached to either the Editor or the Viewer, you will be asked attach to it when you open them. Additionally, Setting8 is sometimes upgraded along with your database when installing an upgrade with a Repair install. See What is a Repair Install during an Enviro Data upgrade, and why should I use it?
If you are switch to a new PC, it is important that you keep your original Settings8 (and some other) files so you can copy them after Enviro Data is installed on the new computer. You can also share this file with other users that have the same workflow that you have.
Deleted 105
Some of the dropdowns in the Select Data may be empty when you try to select a valid value. This may be true even if the individual Lookup table is populated with values. This is most likely because the values in that table are not Enabled. There are two way to correct this.
If you want all lookup values that are in each lookup table Enabled, from the EDITOR click on Maintain Database under the Setup Group then click on Enable all Lookup Values.

If you want to choose which lookup values are avaialble, Topen the lookup table in question using the EDITOR --> Manage Lookups and make sure the Enabled check box on the form / table is checked. You can also open the lookup table in Datasheet mode and then scroll to the right to see which records are enabled. Select the ones required for your project and close the form. NOTE: you will have to refresh by clicking the Refresh Selected Data to see this changes.
The examples below are for Sample Purpose but there may be other lookups that need to be enabled depending on the project you are working on.
The first example show that Purpose under Samples is Null when you attempt to select a value. The others show the lookup talbe and datasheet view with the enabled check boxes.


The current version of the Enviro Data 8D Editor and Viewer programs use an .ACCDB file extension, and not the older .MDB. This change made in mid 2023 allow more fields in tables and increased security that was not available with the 2002 MDB extension. These files are named EnvDAdmin.accdb and EnvDView.accdb respectively. When looking for these files in the Windows File Explorer or File Open forms you can mistake them for other files with the same name but with a different file extensions like icon and lock files that may be in the same folder. Additionally, for sharing data between Enviro Spase 8 and the Viewer, a database is required with the name EnvDView.mdb that is located in the Database folder. This can get very confusing unless you learn to look at the file icons to determine which very small. The graphic below shows three files with and without the extensions.

We recommend that you turn off hiding File Extensions in the Folder Options form. To make this change open the Windows File Explorer and find the Options menu item that opens the Folder Options form. Depending on your version of Windows, this form could be found either from the View menu or with the . . . menu (shown below).

Once in Folder Options, click on the View tab and uncheck Hide extensions for known file types. Click OK once done.

NOTE - this process can also be used to add missing CAS Numbers using a spreadsheet that contain both a LongName and the correct CASNumer field. In both cases, the LongName must match a record in the Parameters table.
As frequently happens, a client needed to import a new set of regulatory limits. They proceeded with normal a Reg. Limit Import and a properly formatted reg. limit format file.
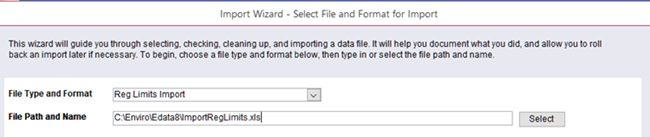
However, when they ran the Reg. Limit Import, the Enviro Data Editor required them to add many new parameters.

This happened even though they were using the setting tp Use CAS Numbers which should have allowed them to match Parameters using their CAS Number.

It was determined that their Parameters table either:
- These new reg. limit parameters were not in the Parameters table,
- If they were present, their names were not spelled the same and/or,
- The parameters to be matched did not have CAS Numbers.
It turned out, all three of the above were true and the import was canceled.
To be able to add the new Reg. Limits, first, we had to update the Parameters (that were in the Reg. Limit Import file) in the Parameters table with the missing CAS Numbers. This required that we link to their Reg. Limit import file in Enviro Data. This can be done by following the steps below.


The Excel file has been linked and named Table 1.
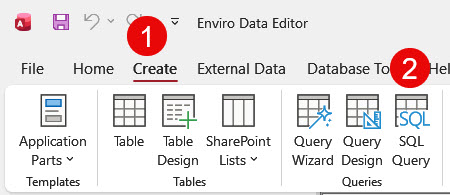
Once the file is Linked in Enviro Data, you need to create a new Query by clicking on Create in the Access Menu and then on Query Design.

When the query opens, right-click on the query's header and Choose SQL View.

You will then copy in the following code by first highlighting the word "Select" and paste in the code
UPDATE [Table 1] INNER JOIN [Parameters] ON [Table 1].ParameterName = [Parameters].LongName SET [Parameters].CASNumber = [Table 1].[CASNumber]
WHERE (([Parameters].[CASNumber] Is Null));
Note that if a "3" shows as seen below, place your curser to the right of it and hit the Backspace key. You should still see the semicolon at the end of line 2 but no spaces. At some point, you will be asked to Save the query. It is not important what you name it so long as you can find it again when needed.

Ensure that the table you linked to, Table 1, is correct. To make sure, right-click the query's header and choose Datasheet View. You should see a number of empty records.
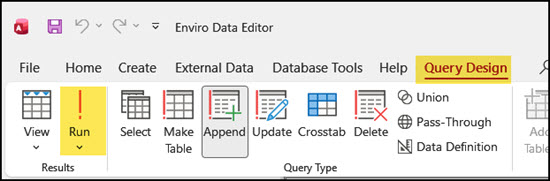
In the Access Menu, click on Query Design. You should see the Update icon highlighted. Run the query to update Parameter records without CAS Numbers.

You are now ready to add the new Parameter names in your new Reg. Limits to the Parameters table. To do this, see the FAQ How can I import new parameters into my database?.
The formats for User-Defined Formats are stored in two places in the Setting8 file; the: SavedImportFormat and SavedImportFormatDetails tables.
If you are setting up a new user that needs these import formats, you could simply copy your Setting8 file into their C:\Enviro\Edata8 folder.
However, if they already have other customized settings different from yours you can copy these tables from your Settings8 file to another users Settings8 file. You can access these by opening C:\Enviro\Edata8\Settings8.mdb and pushing the F11 key to show the Access files list. In the search box, type in "savedimport" and it will display them as shown below. (If you do not see the Search Bar, simply right-click next to the word Tables and choose Search Bar.)
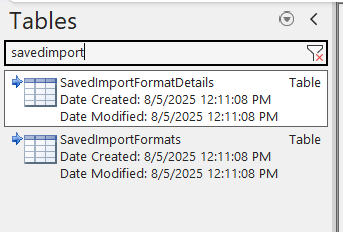
Before moving them. in the new computer, back up these original tables up by renaming them with a different name. For example, adding a suffix to the file name like SavedImportFormat_Original will preserve them if they are needed later.
When ready, open the original PC's Setting8 files in Access and simply drag these two modified files one at a time from the original to the new PC's Settings8 file's table list.
In these FAQs amd in the User Documentation certain typefaces are used to reference the distinct types of objects in the Enviro software system. These typefaces are listed in the following table:

It is not unusual to receive import files supplied by the laboratory that do not match the Parameter Names in your database. Enviro Data provides a simple fix this: Parameter Aliases.
NOTE THIS ARTICLE IS DISCUSSING ONLY PARAMETERS THAT ARE IN YOUR PARAMETERS TABLE THAT HAVE A DIFFERENT PARAMETER NAME OR SPELLING THAN WHAT IS BEING IMPORTED.
When exporting tables or reports from the Enviro Data Viewer, you can select to Un-Alias Parameters in the Display Options form Display Details section. Enviro Data provides an option to alias parameters with different spellings to their synonyms in the Enviro Data Parameters table. Enviro Data remembers that alias and can convert back to the original terminology during retrieval.
Add an Alias Using the Import Wizard
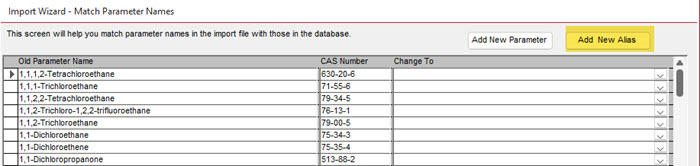
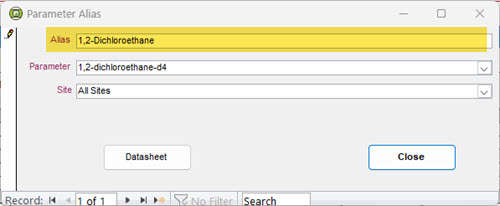
You can add an alias when importing new data. This includes Sites, Stations and Parameters. Any Parameter Names that are not found in the database and NOT ALREADY ALIASED, will be presented by a form that allows you to add them as a new parameter or add and aliases for an existing parameter. That form is below and is a part of the Import Wizard - Match Parameter Names. That process is not discussed in depth this FAQ but basically you select the parameter that you need to change, click on Add New Alias, and then select the correct parameter from the Parameter dropdown on the Parameter Alias form.
Import a List of New Aliases
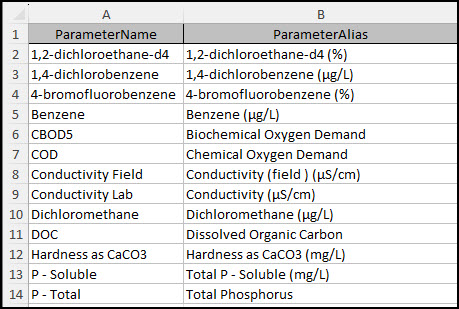
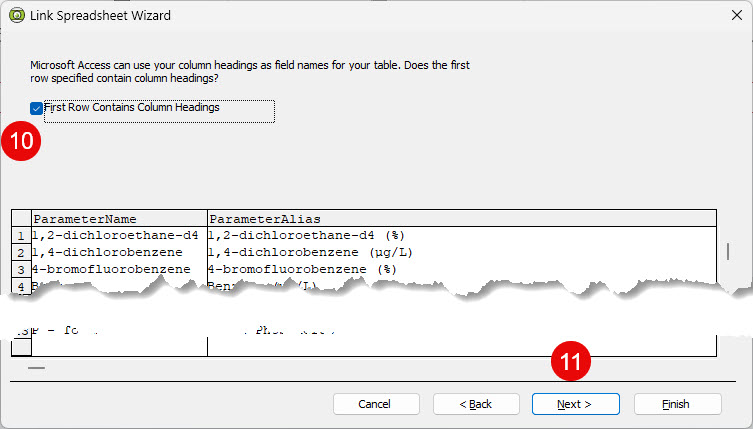
- Make an Excel file with the ParameterName to be matched and the ParameterAlias Needed. (Do not use spaces in the headers.) The column layout should be similar to the one below, including the Header Names.
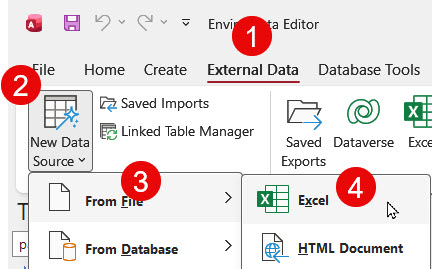
From the Access Menu, Click on External Data, New Data Source, From File and then Excel as shown below.
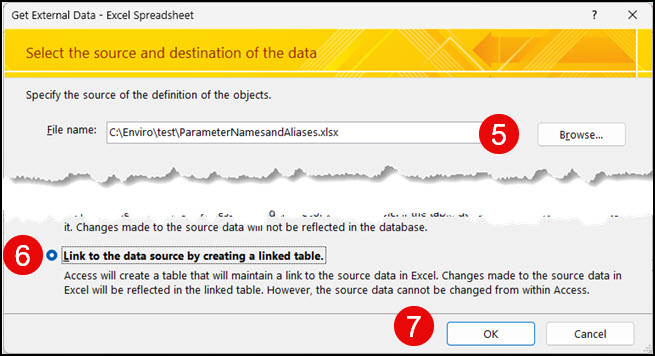
This will open the Get External Data - Excel Spreadsheet form where you will (5) select the file you created, (6) Link it and then (7) click OK to save it.
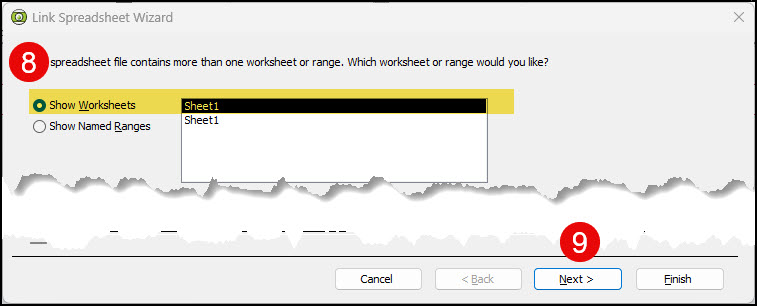
Next, the Link Spreadsheet Wizard form where you will Select the worksheet (if more than one in the spreadsheet.
Now, check the First Row Contains Column Headings option. IF THESE ARE NOT EXACTLY AS SHOWN ABOVE, EDIT YOUR SPREADSHEET AND START OVER.
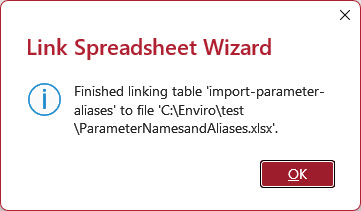
On the next form, name the linked spreadsheet "import-parameter-aliases" and click Finish.
Next you will Create an Access SQL Query to import your Aliases into the ParameterAlias table.
When the query opens, it will have the word "1 SELECT:" in it. ake sure you paste the following over what is there making sure the all the names match.